Learn to Manage C++ Projects Using CMake Like a Pro (Part 1 - Building C++ Programs)
Building small C++ projects is straightforward, but large projects with multiple developers, external libraries, and cross-platform support require a more robust build system. CMake is a meta-build system that simplifies this process by describing your project’s structure and generating platform-specific build files (such as Visual Studio solutions or Makefiles). This course introduces the fundamentals of the C++ build process and gradually covers modern CMake techniques for developing large, cross-platform applications. Before using CMake, you’ll first learn about the tools involved in compiling and building C++ programs.
Before CMake: The Toolchain
CMake is like a project manager. It generates the necessary build files to build a project. It knows how to organize tasks, handle dependencies, and give the right instructions. But it doesn’t do the physical work itself. For that, it needs a team of skilled workers. In the world of C++, that team is called a toolchain.
A toolchain is a set of programming tools used to create a software product. For a C++ project, the essential components of a toolchain are:
-
A Compiler: A program that translates human-readable high level C++ source code into low-level machine code that a computer’s processor can understand.
-
A Linker: A program that takes the machine code from one or more sources (compiled files and any libraries) and combines them into a single executable program.
-
Standard Libraries: A collection of pre-compiled code that provides fundamental functionality. Examples include input/output with
std::cout, and containers likestd::vector.
CMake’s primary job is to find and control a toolchain. It needs to know which compiler to use, where to find libraries, and how to invoke the linker correctly for your target platform.
Compiler
There are several C++ compilers available, but three stand out as the most widely used in the industry - GCC, Clang, and MSVC. CMake is designed to work with all of them. We’ll use GCC in our examples in this introductory chapter, but the choice isn’t that important. CMake will take care of the compiler interactions for us.
GCC (GNU Compiler Collection)
GCC is one of the oldest and most established compilers. It originated as part of the GNU Project and is the standard compiler on most Linux systems. When you see the g++ command, you’re using GCC’s C++ compiler. It’s known for its broad platform support and adherence to standards.
Clang
Clang is a newer compiler front-end, developed as part of the LLVM project. It was designed to be faster and use less memory than GCC, but its most popular feature is its incredibly clear and helpful error messages.
Clang is the default compiler on macOS (via Apple’s toolchain) and is widely used on other platforms, including Windows and Linux. Its command-line interface, clang++, is designed to be a drop-in replacement for g++.
MSVC (Microsoft Visual C++)
If you’re a Windows developer, you’re likely familiar with Visual Studio. The compiler that powers it is MSVC (cl.exe). It’s a highly optimizing compiler with excellent integration into the Windows ecosystem.
While we’ll focus on setting up GCC or Clang for a consistent command-line experience across platforms, rest assured that CMake has first-class support for MSVC. In fact, installing Visual Studio is often the easiest way to get a complete C++ toolchain on Windows. We’ll primarilly use g++ or clang++ in our command-line examples, as their syntax is consistent across all operating systems.
Setting Up a Build Environment on Windows
Option 1: Visual Studio (Recommended for Beginners)
This is the batteries-included approach and easiest way to get started.
-
Download Visual Studio Installer: Go to the Visual Studio download page and get the community edition, which is free for individuals and open-source projects.
-
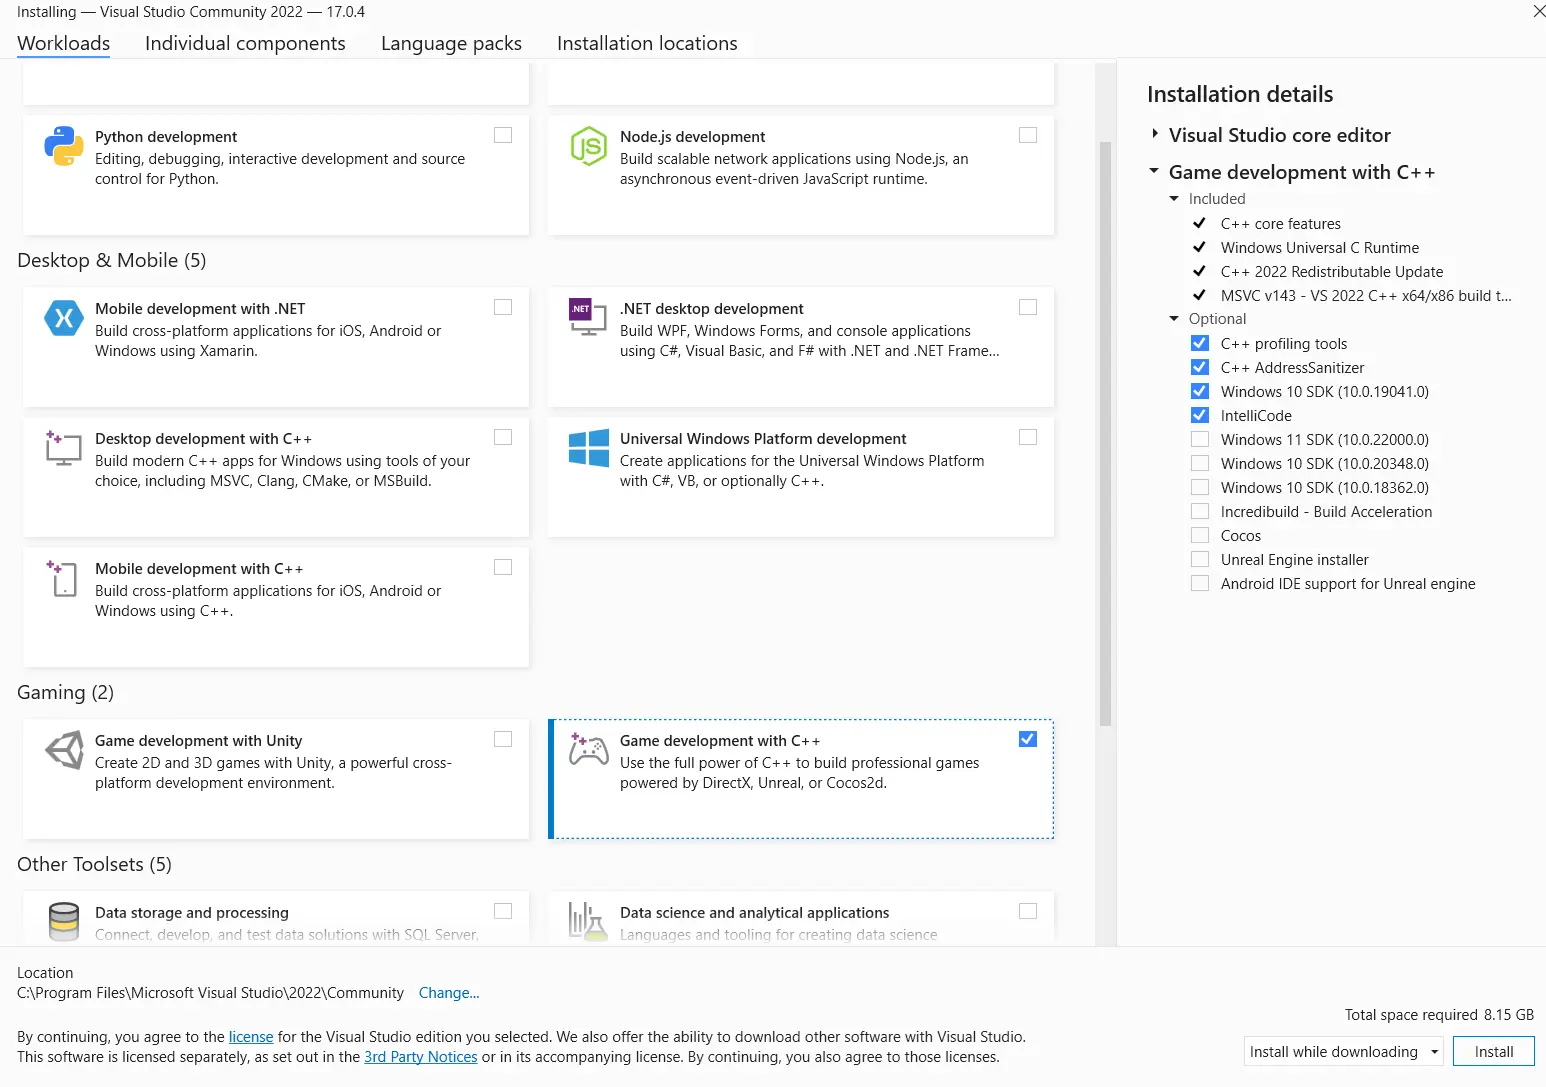
Run the Installer: When the installer launches, it will show a list of workloads.
-
Select the C++ Workload: Check the box for “Desktop development with C++”. This single click will install everything you need: the MSVC compiler, the Windows SDK (which contains system headers and libraries), and a recent version of CMake.
-
Install: Click the install button and wait for the process to complete.
Once installed, you can access the compiler by opening the Developer Command Prompt for VS, which you can find in your Start Menu. This special terminal automatically configures the necessary environment variables.
Option 2: MSYS2 (A GNU/Linux-like Environment)
If you prefer a command-line experience similar to Linux, using GCC on Windows is a great option. The best way to do this is with MSYS2.
-
Install MSYS2: Go to the MSYS2 website and follow their installation instructions. This will install a package manager called pacman, and some terminals we can use. We’ll use the MSYS2 UCRT64 terminal in this example
-
Update MSYS2: Open the MSYS2 UCRT64 terminal and run the following command to make sure everything is up to date:
pacman -Syu
You may need to close and reopen the terminal and run it again to complete all updates.
- Install the Toolchain: Now, use pacman to install the MinGW-w64 toolchain, which includes GCC (g++), the linker, make, and other essential tools.
pacman -S --needed base-devel mingw-w64-ucrt-x86_64-toolchain
This command is likely to install a lot of packages, as there’s often a complex web of dependencies involved (that is, packages that require other packages to be installed)
That’s it! We’ll confirm everything is working correctly in the “Verifying Your Setup” section below.
What’s the deal with ucrt64?
When you install a toolchain in MSYS2, you might see several options like mingw64, ucrt64, and clang64.
- ucrt64 uses the modern Universal C Runtime (UCRT) from Microsoft, which is the current standard. This is generally the one you want.
- mingw64 uses the older MSVCRT runtime. It’s there for compatibility with older projects.
- clang64 provides a Clang-based toolchain.
For this course, sticking with the ucrt64 environment is the recommended path for GCC on Windows.
Setting Up a Build Environment on macOS
macOS makes this process very easy. The operating system ships with stubs for common developer tools, and trying to use them will prompt an installation.
-
Open the Terminal: You can find it in Applications/Utilities.
-
Run the Installer Command: Type the following command and press Enter.
xcode-select --install
- Confirm Installation: A dialog box will appear asking if you want to install the command line developer tools. Click “Install” and agree to the terms.
This will download and install Apple’s Command Line Tools package, which includes clang, clang++, make, and other necessary utilities. It’s the official, Apple-supported way to get a C++ compiler on macOS.
Using Homebrew
If you’re a power user, you might prefer using the Homebrew package manager. Homebrew can install the very latest versions of GCC or Clang/LLVM, which might be newer than the versions provided by Apple.
- To install the latest GCC:
brew install gcc- To install the latest Clang/LLVM:
brew install llvmIf you do this, make sure you follow Homebrew’s instructions for setting your
PATHso the system finds the Homebrew-installed versions first. For beginners, thexcode-selectmethod is perfectly sufficient.
Setting Up a Build Environment on Linux (Debian/Ubuntu)
Linux is a developer’s paradise. Getting a C++ toolchain is typically a single command away. The instructions here are for Debian-based distributions like Ubuntu, but the process is similar on other distros. This might involve using dnf on Fedora/CentOS or pacman on Arch.
- Update Your Package Lists: It’s always good practice to update your package manager’s index first.
sudo apt update
- Install build-essential: This is a special meta-package that installs everything you need for basic compilation, including gcc, g++, and make.
sudo apt install build-essential g++
That’s it! You now have a complete GCC toolchain ready to go. If you prefer to use Clang, you can install it just as easily:
sudo apt install clang
Verifying Setup
Once you’ve completed the installation for your platform, it’s a good idea to verify that the compiler is correctly installed and accessible from your terminal. Open a new terminal window and try one of the following commands, based on the compiler you installed:
To check for GCC:
g++ --version
It should print the version of gcc if it is installed correctly. If it says command not found, it means that the installation was not successful.
To check for Clang:
clang++ --version
If you’re on Windows using the Visual Studio Developer Command Prompt, check for MSVC:
cl
If you see output that includes a version number, congratulations! Your compiler is installed and ready.
An Example of Manual Builds
Now that we have a working compiler, let’s see it in action. This will give us a taste of the manual build process and help us understand the problem that CMake was created to solve.
Let’s create a new file named hello.cpp and add the following code:
#include <iostream>

int main() {
  std::cout << "Hello World!\n";
  return 0;
}
Let’s compile this program. We’re using the GCC compiler in our examples, and feel free to follow along if you are too, or adapt the steps to your own tools. But don’t feel like you need to follow along - eventually CMake will be handling the low-level compiler interactions for us,. We only need to understand the high level concepts.
To compile our hello.cpp file using g++, we’d run the following command in the same directory as the file:
g++ hello.cpp -o hello
If you want to use clang, use the following command:
clang++ hello.cpp -o hello
Let’s break down the command:
-
g++: The C++ compiler program -
hello.cpp: The input source file we want to compile. -
-o hello: An option that specifies the name of the output file. If you omit this, the compiler will default toa.outon Linux/macOS ora.exeon Windows.
If all goes well, there will be no output. Instead, you’ll find a new file in your directory: hello on Linux/macOS, or hello.exe on Windows. This is your executable program!
We can run our program directly from the command line simply using it’s name - hello, in this example. We may need to prepend ./ (as in ./hello) to clarify to our terminal that the program we’re trying to run is in the current directory:
./hello
It should print Hello World!.
Entry Point Not Found
When we compile our project for a specifc platform, it may not work correctly outside of that platform. For example, if we compile our project within the MSYS2 UCRT64 terminal, it is only likely to work when run from that same environment.
If we run it from a different terminal, or just double-click its icon within Windows, it’s unlikely to run. We’ll learn how to create cross-platform projects later in the course. For now, we’ll just ensure we’re running the program in the same environment it was compiled in.
Building Multi-File Projects
In this case, our program is a single source file, which makes it fairly easy to build. But let’s create a project with two source files - greeter.cpp and main.cpp, and one header file - greeter.h. Now write the following lines in the respective files:
geeter.h:
#pragma once
#include <string>

void greet(const std::string& name);
greeter.cpp:
#include "greeter.h"
#include <iostream>

void greet(const std::string& name) {
  std::cout << "Hello, " << name << "!\n";
}
main.cpp:
#include "greeter.h"

int main() {
  greet("second file");
  return 0;
}
To build this, we now need to give both of our source files to the compiler:
g++ main.cpp greeter.cpp -o app
For clang users:
clang++ main.cpp greeter.cpp -o app
We don’t need to provide our header file in this example, as its contents are already getting inserted into main.cpp because of the #include directive. We’ll talk more about header files in the next lesson.
If our program compiled, we can run it in the usual way:
./app
It should print Hello, second file!.
Again, this tiny project with its two source files is manageable. But what if we had 20 files? Or 200? What if some files needed special compiler flags for optimization, while others needed flags for debugging? What if we wanted to build on Windows with MSVC, which uses completely different commands and flags?
The complexity spirals out of control. Manually maintaining build commands or writing platform-specific scripts (like Makefiles or batch files) is a tedious and error-prone nightmare.
This is the problem CMake solves.
But My IDE Handles This Already?
You might be thinking, “I use Visual Studio, and when I add a file, it just works. Why do I need another tool?” It’s a great question.
IDEs like Visual Studio have their own build systems based on Solution (
.sln) and Project (.vcxproj) files. Behind the scenes, these files are automatically updated as you configure your project in your IDE, such as adding new files.This is convenient, particularly for beginners, but they lock you into a specific ecosystem.
Here’s why CMake is often a better choice, especially for large or collaborative projects:
- Portability is King: The primary advantage of CMake is portability. A Visual Studio solution file (
.sln) is specific to Windows and Visual Studio. You can’t give it to a colleague on a Mac using Xcode or a Linux user with a command-line setup. However, CMake configuration files (CMakeLists.txt) are universal. The same file can generate a native Visual Studio project, an Xcode project, or a Linux Makefile without any changes.- A Single Source of Truth: With CMake, your
CMakeLists.txtfile is the single, authoritative description of your project. Everyone on the team using and updating the same build definition is important for consistency. It avoids the “works on my machine” problems.- Automation and CI/CD: CMake is designed for automation. Because it’s a command-line tool, it’s perfect for Continuous Integration (CI) pipelines on build servers like GitHub Actions or Jenkins. You can’t easily run the Visual Studio GUI on a build server, but you can easily run
cmakeandcmake --buildcommands in a script. We’ll cover build automation and its advantages in a dedicated chapter later in the course.Ultimately, an IDE’s project file mixes your project’s structure with IDE-specific settings.
CMake separates these concerns: your CMakeLists.txt file is a pure, portable description of your project. This gives you the freedom to build it anywhere, with any tool, without being locked into a single vendor’s ecosystem.
What’s Next?
We’ve successfully prepared our development environment and gotten a small taste of the build process. We have our tools, and we’ve seen a hint of the complexity that lies ahead.
Now, we’re ready to peel back the layers. In the next lesson, we will go deeper into what actually happens when you run that g++ command.
We’ll explore the C++ compilation pipeline step-by-step, from preprocessing and compilation to the role of the linker. Understanding these fundamentals is the key to mastering any build system, especially CMake.
References
[1] STUDYPLAN.dev (https://www.studyplan.dev/)
[2] GeeksForGeeks (https://www.geeksforgeeks.org/)
[3] CMake.org (https://cmake.org/getting-started/)
Enjoy Reading This Article?
Here are some more articles you might like to read next: